Sometimes, no matter what you do, you can’t get around an upset stomach. Whether you ate something you shouldn’t have or aren’t getting enough of the right nutrients, an upset stomach can have you cramping all day long.
If you find yourself gassy, bloated, and generally uncomfortable due to stomach aches, skip the Pepto Bismol or Tums, and give some of these yoga poses a try.
-
Cat and Cow Pose
Cat and cow pose doesn’t look like it would help much, but it does a lot to warm up your spine, diminish tension in the neck and back, and stimulate your internal organs.
The trick with this pose (and every yoga pose) is to control your breath… You want nice, slow, and controlled breathing with strong diaphragmatic movement to move your internal organs around. Breathing is key!
Here’s how to do it:

Step 1
Start on your hands and knees. Place your wrists directly under your shoulders and your knees directly under your hips.
Point your fingers toward the front of the mat and your toes toward the back.
Step 2
Begin by inhaling while you reach with your head and neck upward, arching your back by compressing the spine, and reaching your belly toward the floor.
Step 3
Exhale, releasing the crown of your head toward the floor, stretching with your back towards the ceiling.
Don’t try to touch your chin to your chest — just relax!
2. Knees-to-Chest Pose
*IMPORTANT: Don’t try this pose if you’re recovering from abdominal surgery or a hernia.*
In Sanskrit, the knees-to-chest pose is called apanasana, which translates to a “wind-relieving pose.”
In other words, if you’re feeling gassy or bloated, this should be your go-to!
Here’s how to do it:

Step 1
Begin by laying down on your back.
Step 2
Exhale, and bring your knees up to your chest, grasping each knee with your hands.
Step 3
If possible, wrap your entire forearm around each knee, grabbing each elbow with the opposite hand.
Make sure to keep your back flat on the floor while stretching your shoulder blades back and slightly tucking your chin.
Step 4
Keep your breath steady, and hold this position for up to a minute, repeating five to six times.
If possible, easily rock forward and backward, and side to side for a gentle back massage
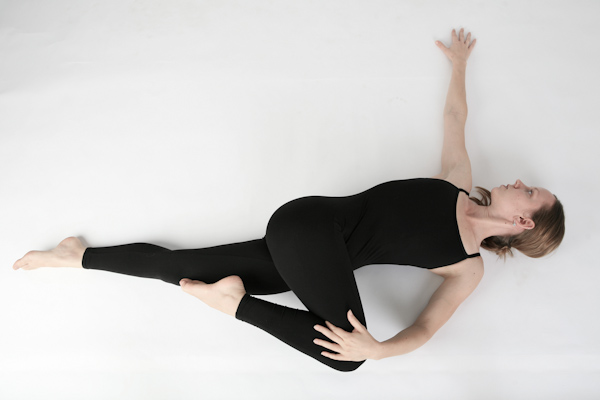
3. Spinal Twist Pose
The spinal twist pose is good for more than just digestion. It helps to relieve tension in the lower back and to ease symptoms of sciatica.
The spinal twist massages the right and left sides of your abdomen, aiding in the relaxation of the digestive tract.
Here’s how to do it:

Step 1
Begin by laying on your back with your feet shoulder-width apart. Extend your arms out to either side, leaving your palms facing upward.
Step 2
Bring your right foot up until it’s beside your left knee.
Step 3
Lift and gently place your right foot on top of your left knee.
Step 4
Now carefully lift your hips off the floor, and shift your weight toward the left side of your body, allowing the right knee to fall.
Step 5
Hold for up to 1 minute and alternate sides, repeating five or six times per side.
4. Bridge Pose
The bridge pose helps your gut by compressing the digestive organs and sending more blood to your heart, relieving indigestion in the process.
It’s a little more difficult but worth a try!
Here’s how to do it:
Step 1
Begin by lying flat on your back.
Step 2
Bend your knees and set your feet on the floor as close to your sit bones as possible.
Step 3
Exhale while using your feet and arms to press down, squeeze the buttocks and lift them off the floor. Lift until your thighs are parallel to the floor.
Step 4
Hold for 30 seconds to one minute and exhale as you gently come back down
5. Child’s Pose
The child’s pose relaxes your whole body and helps you become aware of the connection between your breath and digestive system.
The more you relax, the sooner your stomach pain will pass!
Here’s how to do it:

Step 1
Begin by kneeling with your knees about hip-width apart and your big toes touching.
Step 2
Lower your belly to rest on your thighs and touch your forehead to the floor. If you can’t reach the floor with your forehead, rest it on a block or a pillow instead.
Step 3
Stretch your arms forward on the floor and exhale as you sink into the pose.
This is a resting pose, so hold for anywhere between 30 seconds to several minutes, If you are looking to bring a change into your life by learning yoga for self-rejuvenation or transfer the benefits to others, by getting a professional certificate and expertise .
6. Chair Pose
The chair pose activates your glutes and quads, focusing energy downward into your lower abdomen.
This jump-starts your digestive system by stimulating movement through your intestines. It’s a simple pose with loads of benefits.
Here’s how to do it:
Step 1
Begin by standing with your feet together. Raise your arms above your head so that they’re perpendicular to the floor with palms facing one another.
Step 2
Bend your knees, trying to get your thighs as close to parallel to the floor as possible.
Step 3
Do your best to keep your arms above your head, your inner thighs parallel to one another, and your eyes straight ahead.
Step 4
Hold for 30 seconds to one minute, and inhale as you stand back up and release your arms back down to your sides.
7. Squats
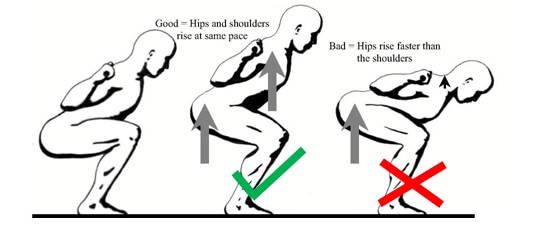
Not only do squats improve flexibility in the hips, knees, and ankles, but they also help to relieve stomach aches by opening up your body’s natural disposal system.
Here’s how to do a squat:

Step 1
Stand with your feet shoulder-width apart.
Step 2
Lower yourself down until the tops of your thighs are parallel with the floor (at least) by bending your knees, sending your hips backward, and allowing your weight to stay on your heels.
If it helps, extend your arms forward for better balance.
You should be able to wiggle your toes while properly squatting.
Step 3
Repeat as many times as you’d like!

Conclusion
Digestive problems can leave you feeling like you’re a victim of your own body, but yoga can help you get control of your gut once again.
In fact, it’s only one of the several health benefits that yoga carries.
Now grab your yoga mat and start relieving that stomach pain!


Leave a comment